A sparkle solution for my cloudy rings

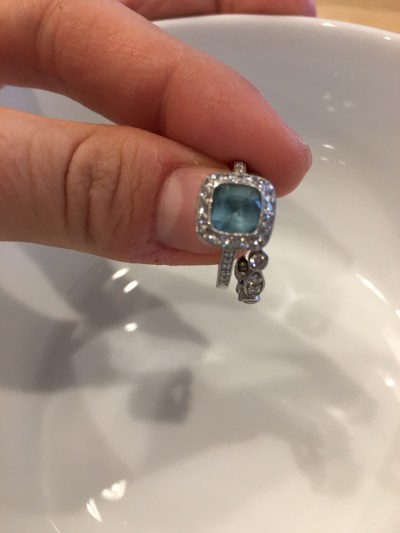
In the winter time, it’s all about constantly washing my hands so I can avoid getting sick and putting on lotion so I can avoid dry skin. This cycle leaves my beautiful engagement ring and wedding band worse for wear sometimes.

I admit I don’t clean my rings as often as I should, and even then, I can never get them to sparkle the way they do after a visit to the jeweler.

Because my engagement ring has an aquamarine stone, certain cleaning methods aren’t recommended, such as boiling and ultrasonic cleaning machines. I’ve done a lot of looking around online to find an easy and quick way to get my rings looking their best, and I found a solution that does the trick.

Continue reading “A sparkle solution for my cloudy rings”

DIY: Costume jewelry home decor

It’s been a few months since I made my friend Jen’s brooch bouquet for her wedding, and there are many things I loved about the project. There was the fun of figuring out how to make it all happen, finding and collecting the materials, and most importantly, creating a special item inspired by her personality and style.

I had a really good time hunting for jewelry at consignment stores, thrift stores, and even in my own stash. The phrase “the thrill of the hunt” truly applies to the process.

Recently, my friend Mary posted a photo of a framed Christmas tree made out of costume jewelry, and a light bulb went off. Here was another way to repurpose baubles to create something new and beautiful! I could make things for myself, but with Christmas around the corner, I could also make some really fun presents.

In the last couple of days, I’ve made trips to Hobby Lobby for supplies and Kellie’s Consignments for jeweled treasures.

In order to figure out the best way to make these, I did some Googling and found a great blog post from Retro Revival. She makes it incredibly simple!

I will plan on sharing more photos next month, because right now I am hoping and planning to give some of the creations as gifts.

For now, here is a wreath design I made for my friend Linda:

When we were celebrating our friend Erin’s birthday Monday night, I shared photos of a tree I was working on with my friends, and Linda fell for this bow brooch. She asked if I could create a wreath design that wasn’t too Christmasy, so that she could have it in her home year-round, with a distressed white frame.

This wreath was created with pins (some new, some vintage) and earrings. I’ve actually found that old clip-ons and stud earrings are my favorite things to work with for this type of project. The backs can be broken off easily, you get a pair of them to work with, and they’re often much less expensive than a jeweled pin. Many of the earrings I bought at Kellie’s Consignments were $3 and $4, but then marked down 60-80%.

I hope this inspires my fellow crafty friends and family to make some fun creations this holiday season or any time of year.

Happy Holi-DIYs!

SaveSave

SaveSave

Why animated characters make the best Halloween costumes

Happy Halloween! Halloween is one of the best times of the year, and I often spend the other 364 days of the year dreaming up the perfect costumes. Often, I’ve drawn upon pop culture and sentimental favorites for inspiration.

In looking back on some of my favorite Halloween costumes, I noticed a common theme: they were animated characters. And it makes total sense. There’s a creative freedom that comes with taking a cartoon and making it come to life. It often means fun makeup and hair, and searching for or creating clothing pieces that match what the characters  wear.

Most of the costumes I’ve worn below were courtesy of the Salvation Army or my own closet, with little additions here and there (the apples on my Mrs. Felicity Fox costume, for example). Zuzu’s Robin Hood costume was actually a Peter Pan costume from the pet store… who knew their outfits were actually so much alike?

Also, when your friend puts the effort into a homemade Marge wig, you have to dress up as both Simpson daughters to really make it count.

Here are 10 examples of our animated character costumes over the years.

Continue reading “Why animated characters make the best Halloween costumes”

DIY: Tamatoa Halloween costume

Back in March, Stella announced that she wanted to be Tamatoa for Halloween. I tweeted about it:

And Jemaine Clement, the voice of Tamatoa, even gave his approval:

And months later, that wish became a reality. This was a total DIY effort, with several visits to the craft store, a search for the perfect purple clothes (thanks, Kohls), an Amazon order for purple tights and kitchen mitts, and lots of gold spray paint.

We took Tamatoa out for a spin during MSU Safe Halloween last week, and it was so much fun to see the reaction of parents, kids, and the MSU students alike. Stella got a lot of attention for her costume, and I think that made her feel very special. It made the last month of putting this costume together worth it.

Here’s how it all came to life, in photo form.

Continue reading “DIY: Tamatoa Halloween costume”

How do I put this delicately? I’m addicted to delicata squash

As I’ve gotten older, it has amazed me how many of the foods I love now that I used to absolutely despise. How does this happen??

I used to think cilantro tasted and smelled like dish soap. Now it’s one of my favorite herbs to eat in the summertime. And in the last several years, I’ve grown to love a variety of root vegetables, particularly when they are roasted together.

Which brings me to squash. Years ago, you couldn’t convince me to try it. Now, it doesn’t feel like fall without butternut squash soup, squash in pastas, roasted squash with meat, even squash on salads!

And if you’ve been around me in the last few weeks, you’ve probably heard me talk about my new most favorite: delicata squash. I’m addicted to this beautiful, sweet, and easy-to-work-with ingredient.

Delicata squash and I were introduced by Blue Apron, which has been a culinary yenta for our family when it comes to discovering new and special ingredients.

Continue reading “How do I put this delicately? I’m addicted to delicata squash”

Tribute pumpkins: A family tradition

One of my most favorite parts about Halloween is carving pumpkins. For our first Halloween as a married couple in 2009, Zack and I invited his cousin Brian over to carve pumpkins together. That was also the year Michael Jackson died, so I decided to carve a tribute pumpkin in his honor. MJ has been inextricably linked to Halloween ever since “Thriller,” so it seemed seasonably appropriate as well.

For the last eight Halloweens, we’ve kept up the tradition of getting together with Brian to carve pumpkins. And if/when there’s a notable death in the world of pop culture (we had a hundred to choose from in 2016), we’ve made a tribute pumpkin in his or her honor.

In the years since, we’ve had Brian’s partner Rion join us, and last night we were also joined by Zack’s cousins Kenny and Jessi. It has become a really fun holiday tradition with dinner, cupcakes, and a Halloween playlist.

Continue reading “Tribute pumpkins: A family tradition”

Cute and easy paper bag pumpkin craft

Hardly a day goes by that Stella isn’t painting, coloring, cutting, taping, gluing, and designing her own mini masterpieces. As someone who grew up going to the summer arts camp offered by the Farmington Hills public schools for six years straight, it is so fun seeing Stella love art.

A couple years ago, she made a paper bag pumpkin at the library, painted orange with jack o’lantern features made out of black construction paper. I brought it out with the Halloween decorations this month, and she talked about wanting to make another one.

Today we made three, for her preschool teachers. And thanks to the package of 100 orange-striped paper bags from the Halloween section at Target, we’ll be able to make 97 more if the mood strikes.

How to make paper bag pumpkins

For this craft, all we needed were old magazines (or newspapers), paper lunch bags, decorative ribbon (or yarn), paints in seasonal colors, a glue stick (not pictured…whoops. Don’t call the Pinterest police on me), and black construction paper.

I helped Stella by cutting out triangle and circle shapes for the nose and eyes, and then jack o’lantern mouth shapes, from the black construction paper. We then glued the shapes into the faces we wanted on the front side of an unopened paper bag.

Then I told Stella to “make snowballs” out of the torn-out magazine pages, which she thought was pretty amusing. We put a few of the paper balls into the paper bags to give them a fuller shape.

I then scrunched the opening of the paper bag together and tied the ribbon at the top.

After that, Stella had fun painting each of the pumpkins her own way.

I feel like these fall on the border between keep-forever kitschy cute and future victims of a KonMari strike, but I love that they were quick and easy to make and saved us (okay, me) from an afternoon of endless “Vampirina” episodes.

It really holds its own with a decorative Pottery Barn pumpkin, don’t ya think?

SaveSave

SaveSave

SaveSave

SaveSave
Necessity is the mother of the life hack

I’ve been saying for the last month that Stella’s Tamatoa costume is the biggest DIY costume venture I’ve taken, whether for myself or for her. I usually put costumes together with thrifted clothing, but this Tamatoa costume has sent me back to the craft store more than a few times.

It has been so fun seeing everything come together, especially when I’ve had to get really creative with how to make it all work without any sewing.

One of the final elements I had to figure out and create was Tamatoa’s big eyes. Originally, Stella said she didn’t care about having the eyes with her costume, but changed her mind as she tends to do. I have a purple hoodie sweatshirt for her to wear with the hood up, so it was a matter of creating something she could wear on top of her head.

I bought a bag of foam balls and a plain headband today, along with purple paint to make the eyelids. My plan is to paint the purple of the eyes, let them dry, and then paint on the irises and pupils on the other half. Then I’ll hot glue the eyes to the headband.

As I was getting ready to paint the foam balls, I wanted to be extra careful that they didn’t roll around and get purple on the white half. At first, I painted a layer of purple and then set them carefully back into these plastic bowls:

But as you can see, they did roll around a bit and caused the paint to rub off. As I tried to think of something that would keep them still as they dried, a light bulb went off.

Gladware lids! We have an average of 2,304,188 pieces of tupperware in our cabinets, so there were plenty of options for me to grab. I found two of the smaller lids, and voila! The foam balls rested snugly in the underside of the lids. When the purple dries, I’ll be able to paint the rest of the eyes and set them in the lids again without worrying about smudges or rolling around.

I’m not sure if there will ever be another moment in history where I’ll need this life hack, other than perhaps a model of the solar system that Stella will inevitably make for a science fair. But right now I’m feeling pretty geeked (or just geeky?) for cracking this code.

Sneak peek: The making of Tamatoa


In the months after seeing “Moana,” my daughter Stella has been telling me that she wanted to dress up at Tamatoa for Halloween. Although he’s a pretty minor character in the scheme of things, he has one of the best songs in the movie. I also kind of loved the fact that Stella wanted to be a character like that instead of the traditional Disney princess.

Earlier this year, Stella began to waiver slightly, talking about dressing up as Elsa instead. But as we talked about all of the fun things we could do to make her into a big purple crab with a sparkly gold shell, she gave me the green light to start getting the components together for a Tamatoa costume.

Side note: Word Press/my computer keep wanting to change Tamatoa to Tomato, which could be an equally great costume.

Continue reading “Sneak peek: The making of Tamatoa”

Thankful for the art of the thank you note

It’s the day before my birthday, and already I’ve been lucky enough to enjoy some early birthday celebrations with friends and family. That means I’ve also been writing a lot of thank you notes lately.

Thank you notes are a form of correspondence that I hope continues on in some form or fashion, no matter what ends up happening to mail in the future.

Because mail is the BEST. Okay, fun mail is the best, junk mail is a pain and waste of paper, bills are a reminder of adulting, and Restoration Hardware catalogs are encyclopedias. But really, checking the mail is one of my most favorite daily rituals, which means Sundays and holidays are wah-wah for me in that department. Ever since I was little, I have loved running to the mailbox to see what’s inside.

In the same way giving presents has become even more fun than receiving presents as I’ve gotten older, I absolutely love sending mail. And while the art of letter writing has mostly gone by the wayside, there’s still something very special, and necessary, about the art of the thank you note.

Gratitude comes in many forms. While thank you notes can seem old-fashioned in a world where we can tag, tweet, and text, taking the extra step to write out a little note goes that extra mile.

My favorite stationery for thank you notes are the Green Inspired cards from Target, because of course. Their cards are whimsical and feel great, and I particularly love the corresponding envelopes.

Aren’t these pretty?! Why shouldn’t an envelope be as special as what’s inside?

Another thing that makes thank you notes even more special to me is a fun stamp. Even though it means braving the post office with at least one child in tow, I love picking out the decorative Forever stamps. These Disney Villains ones are my new favorites:

Someone else who also loves and appreciates the art of mail and cards is Jen, who created the fantastic amaze balls card seen at the top of this page. Her Etsy shop has a ton of hilarious and fun designs for cards. Jen gave me a set of her cards a few years ago, and I’m still holding onto some of them because I can’t bear to send them away yet.

I’m thankful that the art of the thank you note isn’t dead. I’m thankful for the things that make the art of thank you note writing fun.

And I’m so beyond thankful for the people on the receiving end of my thank you notes.

SaveSave